Imagine that you were flying in an airplane and the stewardess came to you,
put a parachute on your back and pushed you out the door without telling you
how to open the chute. Sounds absurd, insane and impossible?
That is exactly what happens to most yachties when they pull the rip chord
on their life raft. They don’t have a clue about how to properly deploy and
use it. They see their life raft inflated for the first time when they
abandon ship.
Ignorance
about life rafts is epidemic. Every couple of years, yachties take their
raft to an inspection station and a week later, pick it up. They feel that
the money paid to the inspector is an insurance policy against disaster.
This approach guarantees they will remain ignorant about how to properly
deploy and use this important piece of survival gear.
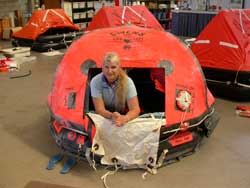
Each time you have your raft inspected, you have a golden opportunity to see
it fully inflated and familiarize yourself with its contents and proper
use. We took our life raft to Marine Safe in Slaack’s Creek south of
Brisbane. The hour that we spent watching our raft being inflated and
inspected could save our lives. Here are some of the facts of Life Raft
Life.
1. Before you launch a life raft, tie the rip chord to the yacht so
the raft doesn’t blow away and disappear in the darkness. The rip chord on
our life raft is sixty feet long. So we don’t expect our raft to inflate
immediately after we pull out a few feet of rip chord. The extra chord is
really not extra. It’s there to allow the raft to sit a safe distance away
from the yacht.
2. When you launch your raft, throw it in the water downwind so that it
won’t be damaged by blowing up against the yacht.
3. Don’t deploy the raft sea anchor until you are well away from yacht.
You don’t want the sea anchor or raft to become entangled in the yacht.
4. Tie your Go Bags containing survival supplies to the rip chord so
that they won’t be lost if they get washed overboard. You can use the rip
chord to recover a Go Bag and bring it into the raft.
5. There is a knife in a pocket on the canopy where you climb on board
the raft. Use this knife in an emergency to cut the tether that joins the
raft to the boat if the boat actually sinks.
6. There are water activated batteries that automatically turn on a
flashing light on the canopy of the raft so that you can see where the raft
is located if you must abandon ship in the dark. 7. The
carbon dioxide bottle contains thirty percent extra carbon dioxide to be
sure there is enough gas to fully inflate the raft. This extra carbon
dioxide escapes through over pressure valves in the tubes of the raft.
These valves are tested during inspection to make sure that they open and
close properly during inflation. If the valves should leak, the raft
contains screw-in plugs to stop the gas leak.
8. Life rafts must be inflated and tested for many hours to make sure
that there are no slow leaks in the material or seams. If they don’t
maintain their pressure, there is a leak that must be found and fixed.
9. Inspectors tell if the carbon dioxide inflation cylinder is full and
ready for action by weighing the cylinder. The weight of the compressed
carbon dioxide is printed on the side of the cylinder (2.04 kilograms). If
the cylinder weight is correct, then carbon dioxide has not leaked from the
cylinder and it’s ready to go. Total cylinder weight on our last life raft
exam in New Zealand was 5.89 kilograms.
10. The inspector tested the emergency hand inflation pump and showed
us how to attach it to the inflation tubes and floor.
11. The life raft canopy has a device for catching rain water that
drains into a tube attached to a plastic bladder in which to store fresh
water.
12. The inspector showed us the contents of the survival pack tethered
to the floor of the raft. Included are food rations, pouches of water,
medical kit, seasickness medicine, signal mirror, signaling flares, fishing
kit, repair/patching kit, flashlight with spare batteries and bulb. All
expired items must be replaced.
13. Our Go Bags need to have lines attached to them so that they can be
tethered inside the raft. This keeps survival supplies from being washed
out of the raft in extreme conditions.
14. There are two inflation tubes on the Givens raft. The gas supply to
each tube is separate and either tube by itself can support the raft and its
occupants.
15. If you store your life raft where it can get wet, moisture will
destroy it. Most life rafts are vacuum bagged so that there is no chance
for ingress of water while the raft sits in its canister on deck ready for
an emergency.
-- Conclusion: The next time you get your life raft inspected, watch
the inspectors inflate the raft and become familiar with the features unique
to that raft. There is no room for cutting corners in the life raft
department. You must know how to deploy and use it. You must have complete
confidence in the people who have inspected and repacked it.
Inspecting life rafts should be done by professionals who have the tools to
do the job properly and the skills to repack it so that water will never get
inside. Honest and competent inspectors can save your life. Dishonest and
shoddy inspectors could cost you your life.
This site is a companion web site to Outback and Beyond.com.


 Ignorance
about life rafts is epidemic. Every couple of years, yachties take their
raft to an inspection station and a week later, pick it up. They feel that
the money paid to the inspector is an insurance policy against disaster.
This approach guarantees they will remain ignorant about how to properly
deploy and use this important piece of survival gear.
Ignorance
about life rafts is epidemic. Every couple of years, yachties take their
raft to an inspection station and a week later, pick it up. They feel that
the money paid to the inspector is an insurance policy against disaster.
This approach guarantees they will remain ignorant about how to properly
deploy and use this important piece of survival gear.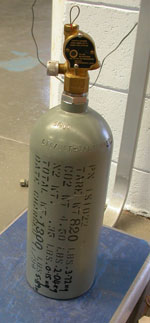 7. The
carbon dioxide bottle contains thirty percent extra carbon dioxide to be
sure there is enough gas to fully inflate the raft. This extra carbon
dioxide escapes through over pressure valves in the tubes of the raft.
These valves are tested during inspection to make sure that they open and
close properly during inflation. If the valves should leak, the raft
contains screw-in plugs to stop the gas leak.
7. The
carbon dioxide bottle contains thirty percent extra carbon dioxide to be
sure there is enough gas to fully inflate the raft. This extra carbon
dioxide escapes through over pressure valves in the tubes of the raft.
These valves are tested during inspection to make sure that they open and
close properly during inflation. If the valves should leak, the raft
contains screw-in plugs to stop the gas leak.